We may be compensated for your purchase of any of the products featured on this page – it helps us keep the lights on :)
Word search puzzles are a great idea for team-building events, work parties, family gatherings, and more. Plus, they’re pretty easy to make! Here are step-by-step instructions of how you can make a word search in Excel.
Make a Word Search in Excel (easy to do!)
WATCH: How to Create a Word Search Puzzle in Excel – (video tutorial)
1. Prepare your Word Search Puzzle Area
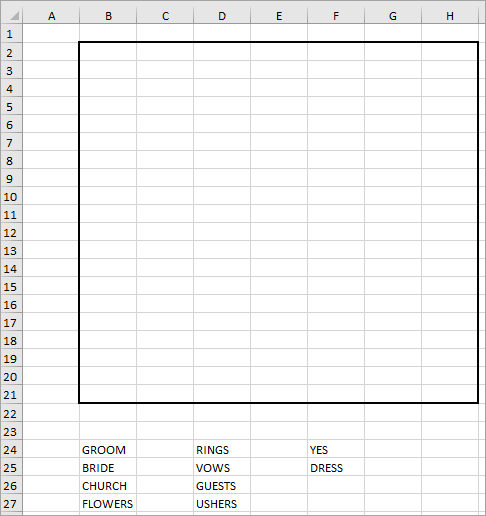
I like to start creating my word search puzzle by preparing the puzzle area.
In this example, the puzzle area will be 20 rows by 7 columns. Your area may differ, just make sure it fits in one page – in case someone prints it.
You can check this by looking at your Print Preview or selecting Page Break View from your View tab / in the Workbook Views section.
Once the area is selected, insert outside borders.
You can find the option to add Outside Borders in the Home tab, in the Font section, then click on the drop-down arrow to see the Border selections. Select either Outside Borders or Thick Outside Borders.
Just below the puzzle area, you will need room to list the words that will be searched.
TIP: When selecting words to search, make sure they are not so long that they don’t fit in your puzzle!
Again, your word search puzzle and list of words to be searched may take up a different area of your sheet. Ideally, it should all fit in a single page.
2. Fill the Word Search Area with Random Letters
Next, fill your word search puzzle area with random letters.
The formula you’ll use for this will be:
=CHAR(RANDBETWEEN(65,90))
How this formula works:
The CHAR function references a list of characters in Excel. Character numbers 65 through 90 refer to letters A to Z, capitalized.
The RANDBETWEEN function selects a value from whatever range you set. In this example, we’re asking it to select a value between 65 and 90.
By combining these two functions, the result will be a random capital letter between A and Z.
Write this formula in the first cell of your puzzle area.
TIP: If instead of writing it, you copy and paste it to your puzzle, select the first cell of your puzzle area, then paste the formula inside the Formula Bar. Otherwise, it will erase your border.
Then, select the cell with the formula and copy it using Ctrl+C. Next, select your entire puzzle area and use Paste as Formulas to copy the formula to the other cells.
TIP: “Paste as Formulas” is the icon with the fx. You can also open the Paste Special options and select Paste as Formulas from there.
Next, select the puzzle area again and center your letters within their cell. You’ll find options to center text in the Home tab / in the Alignment section.
Finally, with your puzzle area still selected, use Ctrl+C to copy it all, then right-click and select Paste as Values.
TIP: “Paste as Values” is the icon with the 123. You can also open the Paste Special options and select Paste as Values from there.
3. Separate the Letters in Your Word List
It’s now time to separate the letters in the words that will be searched. You’ll need to do this so that each letter is in a single cell.
To do this, copy and paste your list of words in an area of your sheet, or a new sheet, that you can use as your “work area.” You can delete this later.
It’ll be easiest if you paste your words in the same column, like a list.
The formula you will need to separate each letter to its own cell will be:
=MID($K2,COLUMNS($K2:K2),1)
*With K2 being the example cell that contains the first word in the list. Make sure to update for your sheet.
How this formula works:
The MID function is one of Excel’s text functions. It is used to extract content from inside a cell using the starting point and number of characters you specify.
The COLUMNS function returns the number of columns in the cell referenced.
By combining them in this formula, the COLUMNS function will specify the location within the cell each letter should be extracted from.
The “1” at the end of the function, specifies the number of characters to be returned – resulting in only 1 letter per cell.
Once the words you want to use in your Word Search have been listed, enter the formula above in the cell to the immediate right of the first word on your list. Making sure to replace “K2” with the cell address of the first word.
Now, copy this formula down your list and extend to the right (for as many cells as you need to separate each letter in your longest word).
Once you’ve separated all the letters, use Ctrl+C to copy the results and then Paste as Values (as we did in Step 2 above). This way you erase the formulas but keep the results.
Finally, align each letter to the center of the cell plus any other formatting changes needed so that the formatting matches that of the other letters currently in the puzzle.

4. Hide the Words in Your Word Search Puzzle
The next step is the most fun. Now is when you get to hide the words in your word search!
TIP: As you hide each letter in your puzzle, it’s a good idea to apply a fill color to highlight each word so that you can see where it is.
Hide Words Horizontally
To hide words horizontally, copy the letters for the word you want to hide and use Paste as Values to paste it into your puzzle.
Hide Words Vertically
To hide words vertically in your word search, you’ll need to copy the letters for the word you want to hide and use Paste as Values, but also Transpose the letters.
Transposing will paste them in the opposite direction from how you copied them. In this case, it will paste them vertically.
Use Ctrl+C to copy the word you want to hide. Then, place your cursor in the cell where you want to place the first letter of the word you’re hiding.
Right-click and select Paste Special. In the options, select both “Values” and “Transpose.”
Hide Words Backwards
Hiding words backwards in your word search will require an extra step. It’ll be easier to select the words to hide backwards ahead of time.
First, select the word(s) you want to hide in reverse inside your puzzle.
Next, in the cell below each letter in that word, insert numbers in consecutive order.
Now you can sort the letters from the one with the highest value assigned to the lowest.
To sort from left to right, go to your Data tab. In the Sort & Filter section, click on Sort. When the Sort window comes up, click on Options and select “Left to Right.”
Then, in “Sort by:” select the row with the numbers and sort them from Largest to Smallest.
Now that the spelling of your word has been reversed, you can apply the steps above to hide it in your word search either horizontally or vertically!
5. Clean-up Your Word Search
Once all your words have been hidden in your word search, it’s time to finalize it.
TIP: It’s a good idea to save a copy of the solutions for yourself. After you’ve saved your puzzle, you can use the Save As command to save it as a new file with a different name. Consider naming it Answer Key or something that will be easy for you to identify.
Back in your original file, delete your work area if it’s on this sheet and clear any highlighting from the puzzle.
For a cleaner look, you can remove the Grid Lines from your sheet. Go to your View tab. In the Show section, deselect Grid Lines.
If you plan to print your word search, you can make it more personal by creating a special Header for it.
The steps were explicit and at a glance i made mine without any hitches
That’s great! I’m so glad this helped you with your word search 🙂