We may be compensated for your purchase of any of the products featured on this page – it helps us keep the lights on :)
Knowing how to save an image from Excel can come in handy. Like if you want to save an Excel chart as a jpg or png image file to use in a presentation.
In this Excel tutorial, you’ll learn, step-by-step, a few different ways that you can save an object in Excel as an image file, like a jpg or png.
In 2020, Excel (finally!) added the Save as Picture feature in Office 365.
I expect this is in other versions of Excel too, but I haven’t been able to confirm. So, I’m sharing instructions for how to use both the newer Save as Picture feature and the older ways.
In each section below, you’ll see 2 sets of instructions, depending on whether your version has the Save as Picture option or not. Pick the one that applies to you.
Ways to Save an Excel Chart (or Other Object) as an Image File
If your Excel has the “Save as Picture” option:
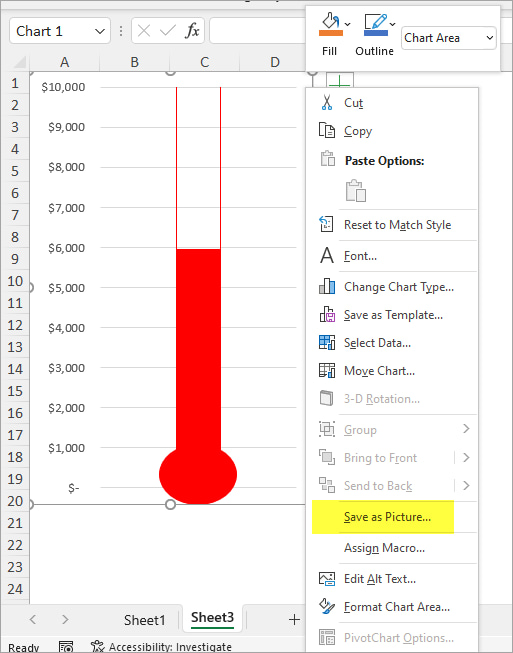
To save a chart in Excel as an image file (or other object like an icon, shape, etc), the easiest way is by:
- With your cursor over the object, right-click and select “Save as Picture.”
- This will open the Save As dialogue box. Here, you can set what image format you want and where to save the file.
You can choose between png, jpg, gif, tif, bmp, or svg formats.

If your Excel does not have the “Save as Picture” option:
To save an object in Excel (chart, icon, shape, etc) as an image file when you don’t have the Save as Picture feature, you’ll need to also open either Microsoft Word or Microsoft PowerPoint.
Below are two ways that you can save your Excel object as an image file:
FYI: The first option below uses Copy as Picture (which I think is a bit safer to help avoid errors).
Option 1: Use the Copy as Picture feature
- Right-click to select the chart (or other Excel object)
- In your Home tab, go to the Clipboard section, and click on the Copy drop-down arrow
- Click on Copy as Picture
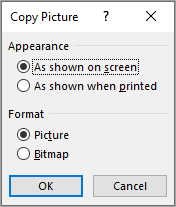
- In the dialogue box, select whether to copy it “As shown on screen” or “As shown when printed” (it’s possible these could look different)
- Then select either Picture or Bitmap format and click OK (you can also now paste your picture (Ctrl+V) anywhere in Excel or other program!)
- Go to either Word or PowerPoint and open a new document/presentation
- Paste (Ctrl+V) the picture in your new document/presentation
- Right-click on the image you just pasted and click on Save as Picture
- In the Save As dialogue box, set your file location and image file type


OR
Option 2: Use the Ctrl+C Keyboard Shortcut to Copy
- Right-click to select to select the chart (or other Excel object)
- Copy it (Ctrl+C)
- Go to either Word or PowerPoint and open a new document/presentation
- Right-click and select Paste as Picture to paste it in your new document/presentation
- Right-click on the image you just pasted and click on Save as Picture
- In the Save As dialogue box, set the file location and image file type
Ways to Save Cell Contents from Excel as a Picture File (png, jpg, etc)
What if you, instead, want to convert the contents of a cell into a picture? (i.e., not an object.)
Here’s what to do to save a range of cells and their content as a jpg or png from Excel.
If your Excel has the “Save as Picture” option:
- Select the cells that you want to save as an image
- Copy the cells (Ctrl+C)
- Find a location where you can paste the cells (this can be anywhere on your sheet or a new sheet)
- From Paste Special select “Paste as Picture”
- Right-click on the picture you just pasted and select “Save As Picture” to open the Save As dialogue box
- Select the location and picture format you want to use
- Save your file

If your Excel does not have the “Save as Picture” option:
As in the last example, below are two ways that you can save your Excel cell contents as an image file.
Option 1: Use the Copy as Picture feature
- Using your cursor select the cell(s) that you want to convert to a picture
- In your Home tab, go to the Clipboard section, and click on the Copy drop-down arrow
- Click on Copy as Picture
- In the dialogue box, select whether to copy it “As shown on screen” or “As shown when printed” (it’s possible these could look different)
- Then select either Picture or Bitmap format and click OK (you can also now paste your picture (Ctrl+V) anywhere in Excel or other program!)
- Go to either Word or PowerPoint and open a new document/presentation
- Paste (Ctrl+V) the picture in your new document/presentation
- Right-click on the image you just pasted and click on Save as Picture
- In the Save As dialogue box, set your file location and image file type


OR
Option 2: Use the Ctrl+C keyboard shortcut to copy
- Select the cells that you want to save as an image
- Copy the cells (Ctrl+C)
- Go to either Word or PowerPoint and open a new document/presentation
- Right-click and select Paste as Picture to paste it in your new document/presentation
- Right-click on the image you just pasted and click on Save as Picture
- In the Save As dialogue box, set your file location and image file type

Leave a Reply