We may be compensated for your purchase of any of the products featured on this page – it helps us keep the lights on :)
Macros in Excel are essentially instructions, in the form of code, used to automate steps in a process.
This can be anything – like reformatting, inserting formulas, new text, etc. It sounds complex, and they sometimes can be, but, for a lot of everyday spreadsheet tasks, creating a macro is super easy and can save you a TON of time.
When to Use a Macro
Macros are ideal for tasks where you repeat the same steps each time you do them.
Let’s say that you have a report you run each morning. The report generates raw data that you need to reformat before you deliver it to anyone.
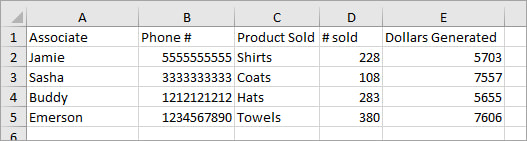
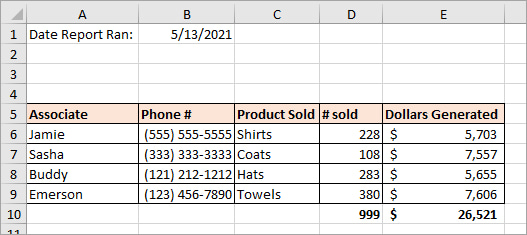
By recording (into a macro) each step you take to reformat the report, you’ll save valuable time on this task every morning.
IMPORTANT: At this time, macros do not work on the mobile or web versions of Excel.
How to Record a Macro in Excel
WATCH: How to Make a Macro in Excel – Video Tutorial
The easiest way to create a macro in Excel is by using the Macro Recorder.
Excel Macro Recorder
The Macro Recorder tool works by creating a record of every step you take during recording. It then converts this record into a code that Excel can execute. This code is your macro.
In other words, when using the Macro Recorder, you do your work as you normally would and Excel will record every step you take to create the macro.
You’ll find the Macro Recorder in the Developer tab of your ribbon. It will be in the Code Section and is the icon labeled “Record Macro.”

If you do not see the Developer tab, you will need to add it.
READ: Instructions on How to Add the Developer tab to your Excel ribbon.
Recording Your Excel Macro
When you’re ready to begin recording your macro, simply click on the Record Macro icon.
Once you click on this, you’ll see the Macro Recorder’s dialogue box.

You have four options. None are mandatory, but there are 2 that I highly recommend paying attention to:
- Macro name: Give your macro a name to make it easier to find it later
- Store macro in: Decide where to save your macro
If you like, you can also assign a shortcut key. I usually do not like doing this because Excel has so many keyboard shortcuts that it can be easy to accidentally override one. But that’s just me.
You can also add a description of your macro. This is a good idea if you’re sharing the macro with other users.
Where to Save Your Macro
You have 3 options for where to save your macro.
1. Personal Macro Workbook
This is a workbook created by Excel for the purpose of storing macros. You can save as many macros here as you like. Only you will have access to macros in this location.
The Personal Macro Workbook is a “Hidden” workbook. To open it, you will need to go to the View tab in your ribbon and, in the Window section, click on “Unhide.” Then, to access the macros, go to the Developer tab and click on “Macros.”
2. New Workbook
You may want to store your macro in a workbook other than your Personal Macro Workbook. This is ideal if you want to save it in a network drive, for example, where others can also access it. Or if you need to email the macro file.
3. This Workbook
Saving your macro in the workbook in which you recorded it is ideal if, say, you plan to share the file with other users who will also need to run the macro.
Once done with the dialogue box, click OK to begin recording your macro.
While the recording is going on, make only the changes to your sheet that you want replicated in the macro.
The macro recorder will record everything exactly as you’ve done each step. For example, if you insert a formula in cell A1, running the macro will always insert that exact formula in cell A1.
Once you’ve finished all the steps you want to include in your macro, click on Stop Recording to end the recording.
Run Your Macro
Now, to run your macro:
1. Go to the Developer tab
2. In the Code section, click on “Macros“
3. Select your macro from the list
4. Click Run
NEXT: Macro Buttons in Excel – ALL You Need to Know (+ video tutorial)
Leave a Reply