• Skip to primary navigation
  • Skip to main content
  • Skip to primary sidebar

Excel Tutorials by Y. Acosta

Excel Tutorials + Tips

  • Excel Tutorials
  • Etsy Store
  • Other Resources
  • About Me
    • About Me
    • Contact Me
    • FREE Printable List of Top Excel Keyboard Shortcuts
  • FREE pdf of Top Excel Shortcuts!

3 Ways to Use Flash Fill in Excel with Examples (+ video tutorial)

❤ Support Free Excel Training by Sharing -

We may be compensated for your purchase of any of the products featured on this page – it helps us keep the lights on :)

Knowing how to use Flash Fill in Excel can help you save a ton of time when reformatting data in a new pattern.

This can include when changing the case of your text. For example, from lower case to all caps.

Or something a bit more complex like creating product numbers or generating employee email addresses from a list of first names and last names.

Example of how to use Flash Fill in Excel to generate email addresses (gif)

What is Flash Fill in Excel?

Not to be confused with Autofill, which detects series, like days of the week or sequence of numbers, Flash Fill detects patterns in formatting and replicates it in other cells.

3 Ways to Apply Flash Fill in Excel

Watch: How to Use Flash Fill in Excel – Tutorial

1. Apply Flash Fill as you type

To use Flash Fill as you type, create the formatting that you want Excel to replicate in the first row of your Flash Fill area. On occasion, you may have to do this in the second row too.

Press Enter. Once you begin typing in the next row, you’ll see your new formatting auto-populate. It’ll look a little like a drop-down list but grayed out.

Flash Fill Example
Flash Fill As You Type Example

Press Enter to populate the other cells.

Did you forget to press Enter? Not to worry! There are 2 other ways you can still use to apply Flash Fill.

2. Click on Flash Fill from your Ribbon

In your Ribbon, go to the Data tab / Data Tools section. You’ll see an icon for it there.

Flash Fill in Excel Ribbon. Data tab / Data Tools section

The Flash Fill icon has a small lightning bolt and looks like this:

Flash Fill in Excel icon

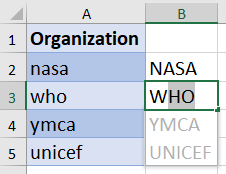
Example of using Flash Fill to reformat a list of numbers

Let’s say you need to reformat a list of product numbers that all contain the same number of characters, to include a dash in the middle.

To the right of your list of numbers, type the first one as you would like all the others to look like.

Once you type the first example, you can click on Flash Fill to complete the rest of your list!

Flash Fill from Ribbon Example

3. Use the Flash Fill Keyboard Shortcut: Ctrl+E

I think the Ctrl+E keyboard shortcut is the easiest way to use Flash Fill.

Simply type your first item how you’d like for all your data to be formatted, press Enter to move to the cell below it, then press Ctrl+E.

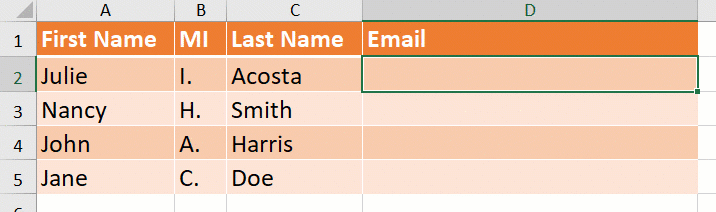
Example of using Flash Fill to create email addresses from a list of names

In this example, we need to create email addresses from a list of names. The first names are listed in one column. The last names are listed in a different column.

They’ll be formatted like this:

  • Add a period between the first name and last name
  • All the email addresses will use the same ending “@company.com”

After typing the first one, press Ctrl+E from your keyboard to populate the rest!

Flash Fill Using the Ctrl+E Keyboard Shortcut Example

Tips to Use Flash Fill the Right Way

There are a few ways to apply Flash Fill. But, regardless of which option you use, there are 3 things that you always need to do:

1. The Flash Fill area needs to be in the column to the right and adjacent to the last column of your data.

For example, if the data that you want to apply Flash Fill to is in columns A, B, and C, the Flash Fill needs to be done in column D.

2. An example of the formatting that you want to replicate needs to be created in the first row of your Flash Fill column. This is what Excel will then copy to the cells below it.

3. Avoid blank rows in your data. Flash Fill will stop auto-populating at the first blank cell to its left.

Enable Flash Fill in Excel

If your Flash Fill isn’t working, it’s most likely because it’s not turned on.

To check that your Flash Fill is enabled:

  1. Go to your File menu
  2. Click on Options
  3. In your Excel Options, select Advanced
  4. Scroll to the Editing section
  5. Make sure that “Enable AutoComplete for cell values” AND “Automatically Flash Fill” are both checked off
Enable Flash Fill from Excel Options (image)
Enable Flash Fill from Excel Options


Related Articles:

  • Hard Code Phone Numbers in Excel (featured image)
    Can You Really Hard-Code Phone Numbers in…
  • Autofill in Excel (feat. image)
    Autofill in Excel - Step by Step Instructions
  • How to Create an Autofill List in Excel - Tutorial
    How to Make an Autofill List in Excel - Tutorial

❤ Support Free Excel Training by Sharing -

blank

About Y. Acosta

Yil's (pronounced like "Jill") passion for Excel spreadsheets can be traced back to her days in marketing, where she spent significant time working on analytics. As a content creator, she now specializes in Excel spreadsheet tutorials. Make sure to visit the About page to learn more.

Reader Interactions

Leave a Reply Cancel reply

Your email address will not be published. Required fields are marked *

Primary Sidebar

Follow us:

Latest Tutorial:

Featured image for How to Use Find & Replace to Remove Wildcard Characters in Excel article

Click Here for More Excel Tutorials!!!

Get Your FREE pdf of Top Excel Keyboard Shortcuts!

* indicates required

blank

Image-button for Invoice Template for Etsy

Copyright © 2025

  • Home
  • Excel Tutorials
  • Resources
  • About Me
  • Privacy Policy & Terms of Use
  • Disclaimer
  • Advertiser Disclosure
  • Contact Me
  • FREE Printable List of Top Excel Keyboard Shortcuts
We use cookies on our website to give you the most relevant experience by remembering your preferences and repeat visits. By clicking “Accept”, you consent to the use of ALL the cookies.
Do not sell my personal information.
SettingsAccept
Privacy & Cookies Policy

Privacy Overview

This website uses cookies to improve your experience while you navigate through the website. Out of these cookies, the cookies that are categorized as necessary are stored on your browser as they are essential for the working of basic functionalities of the website. We also use third-party cookies that help us analyze and understand how you use this website. These cookies will be stored in your browser only with your consent. You also have the option to opt-out of these cookies. But opting out of some of these cookies may have an effect on your browsing experience.
Necessary
Always Enabled
Necessary cookies are absolutely essential for the website to function properly. This category only includes cookies that ensures basic functionalities and security features of the website. These cookies do not store any personal information.
Non-necessary
Any cookies that may not be particularly necessary for the website to function and is used specifically to collect user personal data via analytics, ads, other embedded contents are termed as non-necessary cookies. It is mandatory to procure user consent prior to running these cookies on your website.
SAVE & ACCEPT