We may be compensated for your purchase of any of the products featured on this page – it helps us keep the lights on :)
If you’ve recorded a macro to automate spreadsheet actions, you’ll need to know how to make a macro button in Excel.
Automating your spreadsheet with macros can save you insane amounts of time.
But, sifting through a list of macros to find the one you need can be a pain.
Having a macro button to click on can be a big help!
Say you’ve created a dashboard with a pivot table, pivot charts, or other visuals that need to be updated.
you can make it easier on your client, boss, or whomever, by adding a macro button to trigger the dashboard’s refresh!
What is a Macro Button in Excel?
A macro button is an object that you can assign a macro to. It’s called a button because once you click on it, it runs the macro assigned to it.
This object can be several things – a Form Control button, a shape, picture, icon, etc.
How Do Macro Buttons Work?
Introduced in Excel 2007, the Macro button is a connection between an Excel worksheet and its programming language application.
This is called Visual Basic for Applications, more commonly known as “VBA.”
When you record a macro, its list of action steps is stored in the VBA.
Click on your macro button and Excel will get the assigned macro from the VBA and run it.
How to Make Macro Buttons in Excel
You can assign a macro to pretty much any type of object (pictures, shapes, icons, etc) in Excel. This means you have options to customize them so they match your reports or dashboards!
1. Insert a Macro Button from the Developer Tab
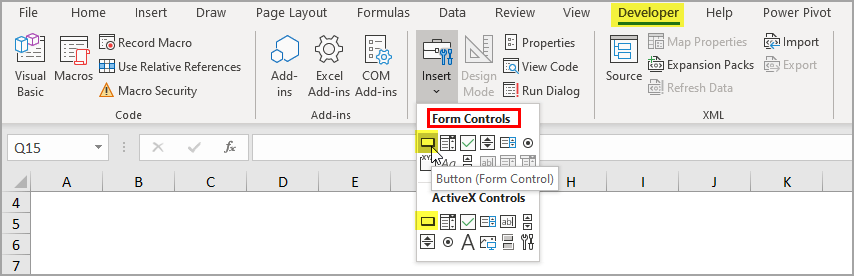
A common way to create a macro button is from the Controls options in the Developer tab.
Once in the Developer tab, look in the Controls section, and click on “Insert.”
Here, there are options to insert a Button from Form Controls and ActiveX Controls.
The Form Controls Button is more user-friendly, in my opinion.
Steps to Assign a Macro to a Form Controls Button:
- Go to your Developer tab
- In the Controls section, click on Insert (it looks like a toolbox)
- Under Form Controls, click on “Button”
- Use your cursor to draw the button on your sheet
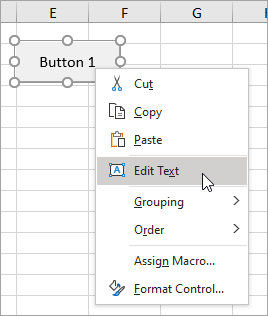
- Once you are done drawing it, the Assign Macro window will pop up
- Select your macro
- Click OK

You can now click on this button to run the macro!
Edit the Form Controls Macro Button
After creating your button, you may need to make some edits to it. Here are some key things you may need to do:
Change the Button Label
To change the label on your button, right-click on it and select Edit Text.
Change the Text Formatting of Your Button
To change the text formatting for your button’s label (font type, size, color, etc), right-click and select Format Control.

The formatting options will be in the Font tab of the pop-up window.
Keep Your Button from Moving on Your Sheet
You may notice your button move to a different spot or change in size if you make changes to the layout of your sheet.
To keep your button from moving or resizing, you’ll need to make sure it’s set to:
“Don’t Move or Size with Cells”
To set this, right-click on your button, select Format Control, and go to the Properties tab.
If you want it to display when printed, also check off the “Print Object” box.
Assign a Different Macro to Your Button
To change the macro assigned to your button, right-click on the button and select Assign Macro.
This will open the Assign Macro window and you can select a different macro.
Steps to Assign a Macro to an ActiveX Button:
- Go to your Developer tab
- In the Controls section, click on Insert (it looks like a toolbox)
- Under ActiveX Controls, click on “Button”
- With your cursor, draw the button on your sheet
- Right-click on your new button and select View Code
- Here, you’ll be able to enter the macro
There are 3 important steps to take once the VBA window opens:
- From the drop-down on the top-left side of the Visual Basic Editor, make sure you’re working on the correct object.
- Call or enter your macro code between “Private Sub” and “End Sub”
- From the drop-down on the top-right side of the Visual Basic Editor, select the action you would like to trigger the button. In most cases, this will be a Click.
NOTE: To Edit ActiveX Buttons, you need to be in Design Mode.
To Change the Label of your ActiveX Button:
- Right-click on your button
- Select Properties
- Edit the name of your button in the Captions field
2. Assign Macro to a Picture, Shape, Text Box, or Icon
You can assign macros to more than just the “button” options in the Developer tab.
In fact, you have more options to customize your button by assigning a macro to a picture, shape, icon, sticker, or text box!
TIP: Consider using a branded image or shape as your macro button!
Whichever type of illustration you select, the steps to assigning a macro to it are the same.
Once you’ve inserted and formatted your shape (or other Excel illustration), you can link a macro to it.
Steps to assign a macro to a shape:
- Right click on the shape and select “Assign Macro”
- Select your macro
- Click anywhere on the worksheet or press Escape to exit out of your button
Make sure your button doesn’t move!
Make sure to also format your shape so that it doesn’t move or resize with the sheet.
You can find this option if you right-click, then select:
- Format Shape
- Shape Options
- Size and Properties
- Under Properties, select “Don’t Move or Size with Cells”
Learn to write macros in a DAY! This book changed my life and career. I hope it can do the same for you.
Leave a Reply