We may be compensated for your purchase of any of the products featured on this page – it helps us keep the lights on :)
A viewer recently asked me how he could apply multiple data validation to the same cells in Excel. He wanted to prevent duplicate entries AND limit the number of characters for those same entries.
Because the Custom Data Validation feature allows only a single formula to be used, a nested formula would need to be created.
This formula will need to include one formula per criteria to be evaluated in the Data Validation.
How to Apply Multiple Data Validation Rules to the Same Cells in Excel in Just 3 Steps!
WATCH: Apply Multiple Data Validation to Same Cells in Excel – Tutorial
1. Plan what formula you’ll use to evaluate for each criteria
You’ll want to begin by determining exactly what you need your Data Validation rule to evaluate for and then use this to create the formula you’ll use.
TIP: I find it easier to note each formula somewhere on my spreadsheet. Seeing it helps me through the thinking process.
For this example, we need the Data Validation formula to evaluate for 2 things:
- Preventing duplicate entries
- Limiting the number of characters entered
Criteria1: Prevent Duplicate Entries
To prevent duplicate entries, you can use COUNTIF($A:$A,A1)=1
*Make sure to lock the cells in the range using F4.
How this works:
COUNTIF will count a cell only if it matches the content of another cell in the selected range.
The “ =1 “ at the end means that the count of a matching item should equal 1. If it’s more than 1, there is a duplicate and this will trigger an error alert.
Criteria2: Limit the Number of Characters Entered
Let’s say you want to limit the number of characters entered in these cells to 5.
You can do this by using LEN(A1)<6
How this works:
The LEN function counts the number of characters in a cell and applying less than 6 at the end will trigger an error alert if 6 or more characters are entered in any of the cells.
If you have more criteria, you would continue creating formulas to evaluate for each.
AND / OR: How many of the criteria should be met?
Next, you also need to decide if you need for ALL the criteria to be met or just 1 of the criteria before the error alert comes up.
If you do not need them all to be met for the alert to come up, then you’ll want to use the OR function in your nested formula.
If you want for all the criteria to be met, then you’ll use the AND function.
For this example, we need all the criteria met, so we’ll use AND.
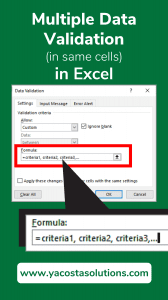
2. Combine your formulas into a single, nested formula
Once you’ve laid out all your requirements and created a formula to evaluate for each, it’s time to combine them into a single nested formula.
If you noted your formulas somewhere on your spreadsheet, it’s even easier! You can just copy and paste each into a single formula that would look like this:
AND(COUNTIF($A:$A,A1)=1, LEN(A1)<6)
Next, copy your new nested formula, but don’t paste it anywhere yet. You’ll need to keep it in your clipboard’s memory a bit longer.
3. Create a custom Data Validation rule for multiple criteria
Finally, select the cells you want to apply the rules to, then go to your Data tab and select Data Validation.

From the “Allow” drop-down menu, select “Custom.”
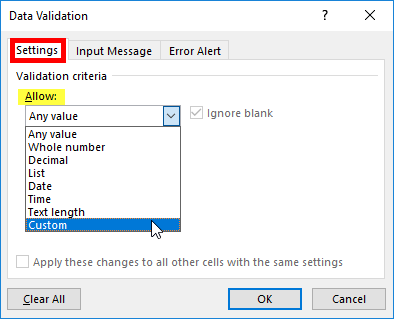
In the Formula field box, type an “ = “ and use Ctrl+V to paste your nested formula in the field. Click OK.
NOTE: Only the Ctrl+V keyboard shortcut will work for this. You cannot right-click and select Paste for this action.
That’s it! You’ve created a custom Data Validation rule for multiple criteria!
FYI, this was created using the desktop version of Excel in Microsoft 365.
")
Leave a Reply