We may be compensated for your purchase of any of the products featured on this page – it helps us keep the lights on :)
You can’t go wrong when you create a crossword puzzle in Excel. They’re great for a team building game, learning, and keeping kids entertained.
How You Can Make a Crossword Puzzle in Excel
WATCH: How to Create a Crossword Puzzle in Excel
In the instructions below, we’ll walk through how you can make a crossword puzzle that will fit in a single page. This way the puzzle can be completed either digitally (on a computer, for example) or be printed.
For reference, my margins in this example are set to 1” on all sides.
1. Format the Area for Your Crossword Puzzle
The first thing you’ll want to do is format the area in which you’ll build the crossword puzzle.
I recommend doing this in Page Layout View. This way you can more easily see where your page borders are. Plus, you can also resize the cells using regular measurement units.
Resize the Columns to Set the Size of the Squares for Your Puzzle
In this example, the squares in the puzzle will be ¼”. This should provide adequate space to write, for anyone that wishes to print it.
FYI: ¼ in = 0.635 cm = 6.35 mm
How to Resize Cells
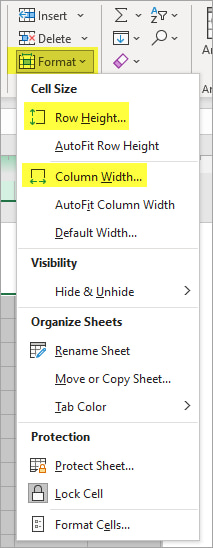
The easiest way to resize all the cells at once is to use keyboard shortcut Ctrl+A to select all the cells on the sheet. Then, in your Home tab, go to Cells section and click on “Format.”

Set the Row height to 0.25” then set the Column width to 0.25”.
Format the Area for the Crossword
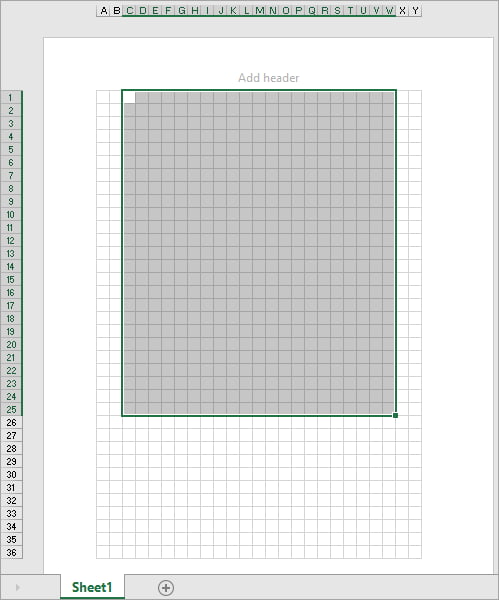
Using your cursor, select an area of your sheet where you will create the crossword puzzle section.
TIP: Consider leaving blank cells at the bottom (or top) of the sheet where you can write clues for each word in your puzzle.
In this example, I’ve selected an area of 25 rows and 25 columns.
With the area still selected:
- Apply All Borders to selected area. This will create a border around each square.
- Apply black fill to the area
- Apply white coloring to the font. This will help you see the words as you type them.
- Set the cell alignment to centered both from top to bottom and horizontally inside the cell. This way your letters will appear exactly in the middle of each cell.

2. Enter the Words in the Puzzle Area
Once the crossword area has been set up, you’re ready to enter the words to solve for.
TIP: For inspiration on words you can use in your crossword puzzle, take a look at our lists of words by theme.
You’ll clear these later, but you’ll want to enter them initially to make sure it works and lines up the way you want.
Typing one letter in each cell, type the words you’ve selected for your puzzle.
TIP: I find it easiest to begin with the longest word
You can use a formula separate each letter into its own cell:
- Somewhere on your sheet (or a different sheet), enter the words you plan to use in your puzzle
- Make sure you have plenty of blank cells to the right of each word
- For each word, reference the cell the word is in with this formula: =MID($A1,COLUMNS($A1:A1),1)
- *with A1 being the location of the cell containing the word
- Drag the formula to the right so that it autocompletes; separating each letter into a single cell
- You can then copy the result of the formula and use Paste Special / Paste Values to paste the letters in your Crossword
You should now see white text in your puzzle area.
Next, select only the cells that contain text and:
- remove the color fill
- change the text font to black
TIP: You can select multiple, non-adjacent cells by holding down the “Control” key as you select the cells. You can then format all selected cells at one time.
You should now see the words in your puzzle in black text and in a white cell.
3. Assign a Number to Each Word
You’ll next want to assign a number to each word. This number should coincide with the clues for that word and will serve as its label in the crossword, guiding your users where to enter their answer.
Here are 2 ways you can insert these numbers by your words:
Insert Number Excel Icons
If you’re using Microsoft 365 or a web version of Excel, you have access to Excel Icons.
FYI: This option will only work if you have 10 clues or less
You’ll find the Icons in the Insert tab of your ribbon, in the Illustrations section.
Once the Icons window opens, type “Numbers” in the search box.
Select the number icons you want to use and click “Insert.”
This will insert the icons on your sheet. It will also create a new tab in your ribbon labeled “Graphics Format” that will be visible whenever any of the icons are selected.
Reformat the Icons
You may want to reformat the icons so they look better on your puzzle.
How you format these numbers is up to you, but here’s a recommendation that I think works with this example.
With all the icons selected, go to the Graphics Format tab and:
- resize the icons to 0.25”
- select a style with a white background to help the numbers stand out
Once done, drag each number and align it next to its corresponding word.
Use Text Boxes for Your Numbers
You can also insert numbers using Text Boxes. You’ll find this option in the Insert tab of your ribbon, in the Text section.
Click on Text Box, then draw your Text Box to your desired size.
Creating a Text Box will bring up the “Shape Format” tab in your ribbon each time one of the Text Boxes is selected. You can use the options here to format your Text Box to fit your puzzle.
Format suggestion:
- Set the Shape Fill to “No Fill”
- Change the Text Fill to white
- Selecting the contents of your text box, use Ctrl+B to add bold formatting to your number.
Once your Text Box looks how you like, you can use Copy and Paste to copy it. Then update each box to display the correct number.
Drag each Text Box and place it next to its corresponding word.
4. Add Clues for Each Word in the Puzzle
Somewhere on your sheet you’ll want to write the clues for each word. Ideally below or above the crossword area.
4. Remove the Answers from the Crossword Puzzle
Your crossword puzzle is almost complete!
TIP: For your reference, consider making a copy of the sheet with the answers
All you have left to do is delete the words from the puzzle!
Select the puzzle area and delete. Don’t worry, this won’t affect your Icons or Text Boxes.
TIP: Consider finishing your crossword puzzle with a nice title / header along the top.