We may be compensated for your purchase of any of the products featured on this page – it helps us keep the lights on :)
You can’t go wrong with a themed bingo game for your party or event! Read on for step-by-step instructions on how you can make bingo cards with words in Excel.
FYI: in this example, we’ll walk through creating a 5×5 bingo card with words.
How to Make a Bingo Game using Words in Excel
WATCH: How to Make a Bingo in Excel – Video Tutorial
Prepare your list of words to use in the bingo cards
To start, you’ll need to make sure you have a list of the words to use in your bingo cards.
Because the cards we’ll be creating in this example are 5×5, I recommend at least 30 words.
If you are printing a lot more cards, you might want to use more words. Just try not to use so many that it takes forever to get bingo.
Once you have a list of words, you’re ready to move on to creating your bingo boards.
Designate a sheet to prep and “stage” each bingo card
For each bingo card you plan to make, you should designate a sheet for staging that card. This work area is where you can prep the contents for each individual bingo card.
For example, Sheet1 would be the staging sheet for Bingo Card #1. Sheet2 for Bingo Card #2 and so on.
Let’s walk, step by step, through creating the first staging sheet (for Bingo Card #1).
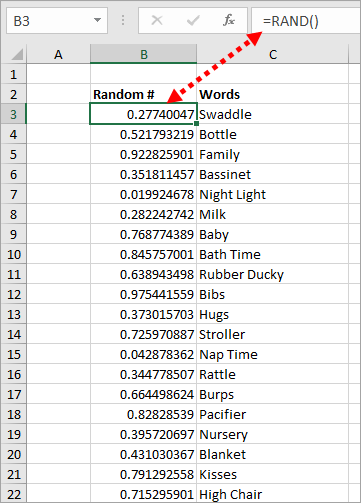
1. Enter your list of themed words in your sheet
The first thing you’ll need to do is copy your words, or type them, in a single column in your Excel spreadsheet. There should be only 1 word (or term) per cell.
2. Use the RAND function to mix up your list of words
Next, you’ll need a way to mix up your words so that each bingo board is different.
You can use the RAND function (it stands for “random”) for this.
The RAND function works by generating a random number between 0 and 1. It refreshes each time an action is taken on your spreadsheet.
The values from the RAND function will keep changing as you work. DO NOT PANIC, this is OK and is what we want to happen.
On the column next to your words (either side will work), type =RAND() in each cell.
TIP: To save time, you can type this into the first cell and drag down to fill the rest or use copy and paste (Ctrl+C & Ctrl+V).
Your list of words and random numbers should look something like this:
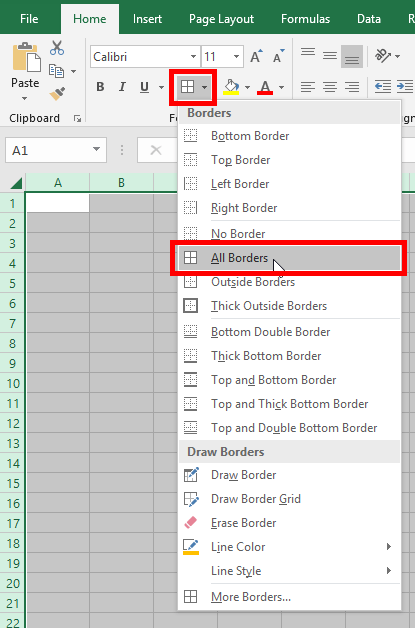
3. Create a mock bingo board in your sheet
Still working in the same staging sheet where you entered the word list and random numbers, create a “mock” bingo board.
With your cursor, select a section of 5×5 cells. Or, while pressing the Shift key on your keyboard, arrow over 5 cells to the right, then 5 cells down.
Then, with this area still selected, add borders around all the selected cells.
How to Apply All Borders
You’ll find the Borders option in the Home tab, in the Font section. Once here, click on the Borders drop-down options and select “All Borders.”
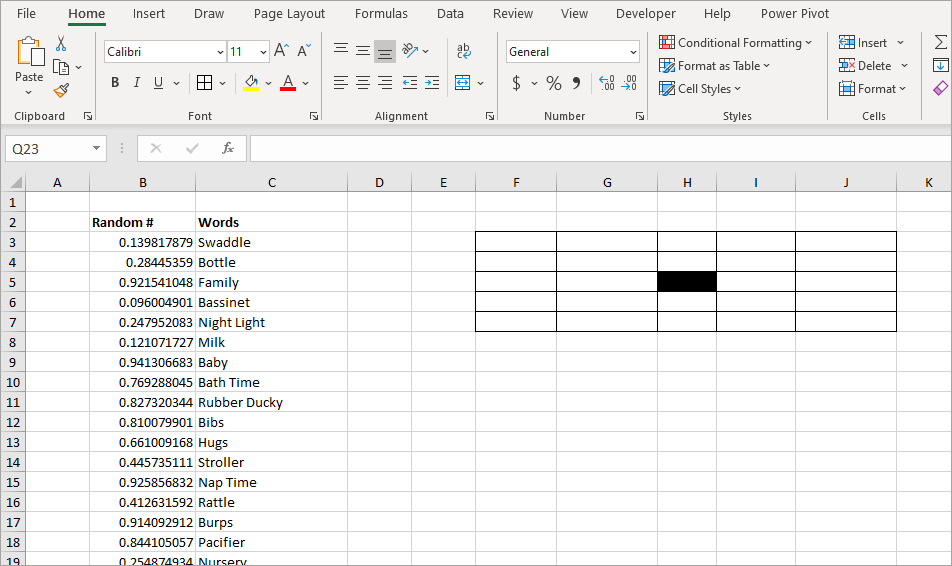
4. Black out the free-space
Once you’ve added the borders, black out the center cell. This will reflect where the free-space will be on the bingo card.
With your cursor on the cell, go to your Home tab, in the Font section, and click Fill. You can use any color.
At this point, your staging sheet should look something like this:
5. Fill the mock bingo board
Next, let’s fill in the 5×5 mock bingo board you just created.
There are only 25 spaces on the board. You’ll likely have more words than spaces. That’s OK.
Begin by linking the first cell of the 5×5 area to the first word on your list. For example, “ =C3 “
Drag down to copy the link to the other 4 squares in this column. Or use copy and paste.
Then, in the first cell of the second column of the 5×5 area, link to the 6th word in your list. Copy this down.
Repeat for the next 3 columns.
In my example, my list of words is in column C of the sheet. So, this how the formulas I used in each cell of the 5×5 area to link to the words looks like:

6. Duplicate your staging sheet
While this is not necessary, it’ll be easier if you make copies of this sheet to use for any additional bingo boards you’ll be making.
TIP: Ideally, you should make enough copies to equal the number of boards you want to create.
You could also do your boards in batches. For example, if you want to make 25 bingo boards, create 5 copies of the staging sheet then refresh and print them 5 times.
How to Copy and Rename a Sheet
Copy the sheet by placing your cursor on its tab, right-clicking and selecting “Move or Copy.”
Check off the option for “Make a Copy” and click OK.
Rename the sheet by right-clicking on the tab again and selecting “Rename.”
7. Make each bingo board unique
For a successful bingo game, you can’t have duplicate boards.
To make each board unique, you’ll need to sort your list of words in each staging sheet by the random values.
Because the values are populated by the RAND function, each time you copied the sheet, the values should have refreshed.
This means that, when you sort them, each list will now be in a different order.
Because your mock board is linked to the words, your mock bingo board will also be updated.
How to Sort Your List
To sort your list, place your cursor somewhere on your data set (with the values and word lists).
Go to your Data tab and select Sort.
In the pop up, make sure that “My Data Has Headers” is checked off.
Sort by the column with the values.
8. Format the bingo boards for printing
Now that you’ve created unique mock-boards, it’s time to create the final bingo cards for your event.
- In a new tab (I named mine “Boards”), create a board with the same number of squares as your mock-board.
- Use the All Borders formatting to border the squares.
- Apply text-wrapping (in case any of the words are too long).
Apply All Borders to your squares
In this example, we’re making 5×5 boards. Select a 5×5 area (for a total of 25 squares) then go to your Home tab and, in the Font section, click on Borders and select “All Borders.”
Resize the rows and columns
You can resize the squares by dragging the rows and columns.
TIP: Format your first row and column as you would like, then use the Format Painter to format the others to be the same size.
If you want to use a specific size, like 1″ or 2.5 cm, you may want to switch to the Page Layout Workbook View. In this view you’ll be able to work with common measurements.
Add all-center alignment and text wrap formatting
Next, select all the squares.
With all your bingo squares selected, in your Home tab, in the Alignment section, select:
- Middle Align
- Center and
- Wrap Text
9. Add the words to your bingo boards
Now that you’ve formatted the first of your final bingo boards, you can fill in the words.
This will be done by linking your final bingo boards to their corresponding staging board.
You can do this a couple of ways, depending on your version of Excel:
- If your version of Excel has the Paste Link Feature under the Paste Special Options
- If you do not have the Paste Special feature
Use the Paste Link Feature
Go to the sheet with your first mock-board, select the entire mock-board, and copy it.
Return to the bingo board (that you’ll print).
Place your cursor on the first square (on the top left corner of your board), right-click, and select Paste Special, then Paste Link.
This will create a link to and populate the contents of your first mock-board.
TIP: Don’t forget to black-out your middle square!
Manually Link the Boards (if your version of Excel does not have the Paste Link Feature)
Link each cell in your first board to its corresponding cell in the first mock-board
Select the corresponding cell from your mock-board, and press Enter.
You can do this by using the “ = “ key.
Type the “ = “ in the first square of your new board.
Go to your first mock-board, select the first square. Press Enter.
This is what the formula looks like for me: =Sheet1!F3
Click here to learn more about linking cells within the same workbook.
Make each cell reference absolute
This part is a bit tedious, but it will come in handy in a moment.
The next step is to make each cell reference absolute. To do this, you’ll need to step into each cell and add the dollar signs to the cell links.
The easiest way to o this is by selecting a cell, pressing F2 to step into it, then follow this with F4 to add the dollar signs, making the cell reference absolute.
Repeat this for each cell in your board.
TIP: Don’t forget to black-out your middle square!
10. Make copies of your bingo cards
Now that you’ve finished your first bingo card and linked it to its corresponding mock-board, you can make the rest of your cards.
Using Copy, then Paste, copy the bingo board you just created and paste it just below the original (leaving a row or 2 in between).
Repeat this so you have 1 bingo board per mock-board you created.
If you’re using the Paste Special, Paste Link option:
Go to your second mock-board and use the Paste Link feature again on your second bingo board.
Repeat for however many more boards you want to create.
If you are NOT using the Paste Special, Paste Link option:
You’ll use Find & Replace to update the links in each so that they reference the correct mock-board.
To do this, select all the cells in your second final board and use Find & Replace (Ctrl+H) to update the cell references so that they point to your second mock-board.
For example, if your first mock-board is in a tab named Sheet1 and your second mock-board is in a tab called Sheet2, you would replace all the references to “Sheet1” with “Sheet2”.
It would look like this:
Repeat for however many more boards you want to create.
11. Prepare your bingo cards for printing
Now that your final bingo cards are ready, you can prep them for printing.
Set your Print Area
First, select all your boards but not any columns or rows around them and set this as your Print Area.
You’ll find this in your Page Layout tab, in the Page Setup section. Click on Print Area and then Set Print Area.
Insert a Page Break Between Each Bingo Board
Then, to print each board separately, insert a Page Break between each.
You’ll find the Page Break option in the Page Layout tab in the Page Setup section.
Add a Custom Header or Footer to your Bingo Cards
To add more personalization to your bingo cards, you can add a Header and/or Footer message for the event!
You can check how your bingo cards will look when printed by using your Print Preview.
Leave a Reply